How to setup TaskWarrior and TimeWarrior for CLI tracking
Introduction
I recently setup TaskWarrior and TimeWarrior; I even briefly wrote about them in my daily code logs. I love the platform so much but I had found it a little difficult to flip through the docs just to get everything setup. In this post, I’ll show you all of the steps to getting it setup how I have it along with some additional notes. If you follow along, you will have TaskWarrior and TimeWarrior installed on your computer and can start keeping track of what you have to do and (more importantly) what you already did!
Caution - I only have a mac - I don’t know if any of this applies to non-mac computers.
If you regularly use the command line, this is for you. In order to complete this tutorial, you’ll need a little bit of patience, admin privileges, and a text editor. I assume that you already have homebrew installed. If not, you can easily get homebrew.
Installation
Let’s install. I’ll let you know at the outset that the documentation does cover this, but my experience was that there were too many options in the documentation and also that it was different on the site than on github. This is what worked for me.
TaskWarrior installation
It is super simple. Fire up your terminal:
brew install task
brew install tasksh
Yep, that’s it. You are good. You may get a message that says you do not yet have a .taskrc - go ahead and agree to let one be made for you.
TimeWarrior installation
TimeWarrior is a little bit more of a bear, but not much. If you do not have cmake, you will need to install it.
skip this one if you already have cmake
brew install cmake
sudo chown -R $(whoami):admin /usr/local/share/man
brew link cmake
Once you have cmake, you are ready to go here. The first line downloads the tarball. Then, you have to go and cmake it.
curl -O https://taskwarrior.org/download/timew-1.0.0.tar.gz
tar xzf timew-1.1.1.tar.gz
cd timew-1.1.1
cmake -DCMAKE_BUILD_TYPE=release .
make
sudo make install
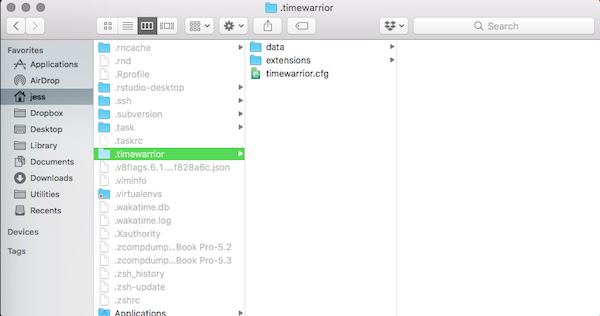
You can verify everything is working by typing timew help - you should get a very long response. Your home folder may now include the following: /.task, .taskrc, and /.timewarrior
Configuration
I configured both for me, and if you start with this setup, you will be able to move to something that meets your needs.
TaskWarrior configuration
All of the configuration is in the .taskrc file that may have been set up for you during installation. If so, open it for editing. If not create a new one. I use atom - it will automatically generate a file if it doesn’t exist, but you can use any text editor.
In your home directory:
atom .taskrcIn the editor, you may see nothing or:
# [Created by task 2.5.1 3/7/2018 15:30:01]
# Taskwarrior program configuration file.
# For more documentation, see http://taskwarrior.org or try 'man task', 'man task-color',
# 'man task-sync' or 'man taskrc'

# Here is an example of entries that use the default, override and blank values
#   variable=foo   -- By specifying a value, this overrides the default
#   variable=      -- By specifying no value, this means no default
#   #variable=foo  -- By commenting out the line, or deleting it, this uses the default

# Use the command 'task show' to see all defaults and overrides

# Files
data.location=~/.task
This basic configuration just points to where your task data storage is. I changed mine to the following:
# [Created by task 2.5.1 3/7/2018 15:30:01]
# Taskwarrior program configuration file.
# Files
data.location=~/.task

# Show the tracking of time
journal.time=on
# Do not use color
color=off

# Shortcuts
alias.dailystatus=status:completed end.after:today all
alias.punt=modify wait:1d
alias.someday=mod +someday wait:someday

# default start on Sunday - I temporarily had mine start on Monday and went back to Sunday
# weekstart=monday

# Make searches case insensitive, personal preference
search.case.sensitive=no

# Set daily burndown as default
alias.burndown=burndown.daily

# Indicate the active task in reports
active.indicator=>

# task ready report default with custom columns
default.command=ready
report.ready.columns=id,start.active,depends.indicator,project,due.relative,description.desc
report.ready.labels= ,,Depends, Project, Due, Description
#if none of the tasks in a report have a particular column, it will not show in the report
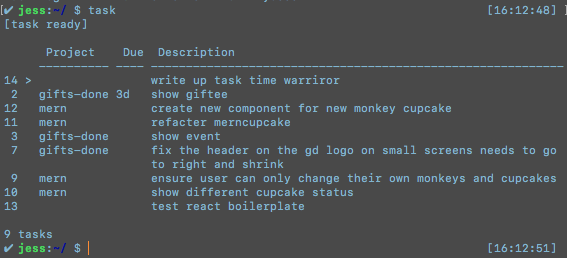
Essentially, I have set it up so that the default output is the ready report and it is structured with the columns that I have identified. Note that ‘default.command’ means what taskwarrior should do when you just type task at the command line.
TimeWarrior configuration
The configuration can get pretty fancy, but I think the most essential is to setup your likely/probable/exact working hours. This helps because it makes it clear when you are out, but it also stops tasks that you leave running, say overnight. Configuration for time warrior goes into /.timewarrior/timewarrior.cfg. If you do not have that file, just add it.
Here is my setup that just says that I am out of the office before 0500 and after 1900 every day:
# setup ooo times
define exclusions:
  monday    = <5:00 >19:00
  tuesday   = <5:00 >19:00
  wednesday = <5:00 >19:00
  thursday  = <5:00 >19:00
  friday    = <5:00 >19:00
  saturday  = <5:00 >19:00
  sunday    = <5:00 >19:00
Now, when I run, say timew week, this greys out my out of office hours:

A fun add on for your zsh profile.
Ok. The whole way that I was introduced to TaskWarrior was through a post on dev.to all about everyone sharing Terminal views. I saw a prompt that was unicode character and someone said that it changed based on their task status. Intrigued, I dug in. I added the task status to my prompt based on Paul Fenwick’s tweet referred to me in another tweet from Dave Jacoby after a discussion on dev.to.
I simply put this at then end of my .zshrc (I’m using oh-my-zsh with the philips theme). This adds unicode emoji to my prompt for a high level overview of where I’m at!
# add Taskwarrior
# TASK WARRIOR INTO MY PROMPT
# this part is just fun-with-utf8
# https://twitter.com/pjf/status/852466839145795584
URGENT="2757"
DUETOMORROW="2690"
DUETODAY="2691"
OVERDUE="2639"
OK="2714"

# shows if any TaskWarrior tasks are in need of attention
function task_indicator {
    if [ `task +READY +OVERDUE count` -gt "0" ]  ; then
        printf "%b" "\u$OVERDUE"
    elif [ `task +READY +DUETODAY count` -gt "0" ]  ; then
        printf "%b" "\u$DUETODAY"
    elif [ `task +READY +DUETomorrow count` -gt "0" ]  ; then
        printf "%b" "\u$DUETOMORROW"
    elif [ `task +READY urgency \> 10 count` -gt "0" ]  ; then
        printf "%b" "\u$URGENT"
    else
        printf "%b" "\u$OK"
    fi
}
task="\$(task_indicator)"
addprompt=$task
PROMPT="$addprompt $PROMPT"
Go try it out
You can start using these right away. Keep in mind that TimeWarrior reports will not be too exciting until you use it for awhile.
- Create a new task in the project test and then start working on it
task add test task project:test
#task warrior will assign a new task number, like `task 1 created`
task 1 start- Create a new task in the project test with a tag of analysis (you don’t have to use tags, but you can)
task add assess the things +analysis project:test
#task warrior will assign a new task number, like `task 2 created`- Look at your tasks. If you followed my
.taskrcsetup, this will give you both task 1 and task 2 in a task ready table.
task- Stop working on task 1 and finish it (if you just say
done,stopis implied. But you may start and stop a task many times before finishing it.)
task 1 stop
task 1 done- See your daily and weekly time spent
timew day
timew week- (edit next day) Fix the time attributed to something if you accidentally leave it running
timew week
# Oh no, that is not right!
timew summary :id
# now we know the id (the @number) for our tasks today
timew @1 shorten 1hr
# or maybe it was too short
timew @1 lengthen 1hr
# or maybe the start time was wrong
timew @1 move 06:00
You are now good to go. Once you feel comfortable, or if you want to do something else, dive into the TaskWarrior docs.


